
Attribute directiveها
با attribute directiveها ظاهر یا behavior مربوط به DOM elementها و componentهای Angular را تغییر دهید.
ساخت یک attribute directive
این بخش شما را در ساخت یک highlight directive راهنمایی میکند که background color مربوط به host element را روی yellow تنظیم میکند.
- برای ساخت یک directive، از command مربوط به CLI یعنی
ng generate directiveاستفاده کنید.
``shell ng generate directive highlight ``
CLI فایل src/app/highlight.directive.ts و یک test file متناظر به نام src/app/highlight.directive.spec.ts را میسازد.
```angular-ts import {Directive} from '@angular/core';
@Directive({ selector: '[appHighlight]', }) export class HighlightDirective {} ```
property مربوط به configuration در decorator مربوط به @Directive()، CSS attribute selector مربوط به directive یعنی [appHighlight] را مشخص میکند.
ElementRef از طریق property مربوط به nativeElement خود، دسترسی مستقیم به host DOM element میدهد.
ElementRefوinjectرا از@angular/coreimport کنید.
- از
injectاستفاده کنید تا reference به host DOM element بگیرید؛ همان elementی کهappHighlightرا روی آن اعمال میکنید.
- به کلاس
HighlightDirectivelogic اضافه کنید که background را روی yellow تنظیم کند.
// #docregion
import {Directive, ElementRef, inject} from '@angular/core';

@Directive({
  selector: '[appHighlight]',
})
export class HighlightDirective {
  private el = inject(ElementRef);

  constructor() {
    this.el.nativeElement.style.backgroundColor = 'yellow';
  }
}<p app:Highlight>This is invalid</p>اعمال یک attribute directive
برای استفاده از HighlightDirective، یک element از نوع <p> به HTML template اضافه کنید و directive را بهعنوان attribute روی آن بگذارید.
<!-- #docregion -->
<h1>My First Attribute Directive</h1>
<!-- #docregion applied -->
<p appHighlight>Highlight me!</p>
<!-- #enddocregion applied  -->

<p appHighlight="yellow">Highlighted in yellow</p>
<p [appHighlight]="'orange'">Highlighted in orange</p>

<p [appHighlight]="color">Highlighted with parent component's color</p>
Angular یک instance از کلاس HighlightDirective میسازد؛ این کلاس با inject(ElementRef) یک reference به element مربوط به <p> میگیرد و background style آن را روی yellow تنظیم میکند.
مدیریت eventهای کاربر
این بخش نشان میدهد چگونه تشخیص دهید کاربر mouse را وارد element یا از آن خارج میکند و در پاسخ، highlight color را تنظیم یا پاک کنید.
- Host event bindingها را با استفاده از property مربوط به
hostدر decorator مربوط به@Directive()configure کنید.
// #docplaster
// #docregion imports
import {Directive, ElementRef, inject} from '@angular/core';
// #enddocregion imports
// #docregion

// #docregion decorator
@Directive({
  selector: '[appHighlight]',
  host: {
    '(mouseenter)': 'onMouseEnter()',
    '(mouseleave)': 'onMouseLeave()',
  },
})
// #enddocregion decorator
export class HighlightDirective {
  private el = inject(ElementRef);

  // #docregion mouse-methods
  onMouseEnter() {
    this.highlight('yellow');
  }

  onMouseLeave() {
    this.highlight('');
  }

  private highlight(color: string) {
    this.el.nativeElement.style.backgroundColor = color;
  }
  // #enddocregion mouse-methods
}
// #enddocregion- دو event handler method اضافه کنید و eventهای host element را از طریق property مربوط به
hostبه آنها map کنید.
// #docplaster
// #docregion imports
import {Directive, ElementRef, inject} from '@angular/core';
// #enddocregion imports
// #docregion

// #docregion decorator
@Directive({
  selector: '[appHighlight]',
  host: {
    '(mouseenter)': 'onMouseEnter()',
    '(mouseleave)': 'onMouseLeave()',
  },
})
// #enddocregion decorator
export class HighlightDirective {
  private el = inject(ElementRef);

  // #docregion mouse-methods
  onMouseEnter() {
    this.highlight('yellow');
  }

  onMouseLeave() {
    this.highlight('');
  }

  private highlight(color: string) {
    this.el.nativeElement.style.backgroundColor = color;
  }
  // #enddocregion mouse-methods
}
// #enddocregion
با configure کردن event listenerها روی host property مربوط به directive، به eventهای DOM elementی که میزبان attribute directive است subscribe کنید؛ در اینجا element مربوط به <p>.
Directive کامل به این شکل است:
// #docplaster
// #docregion imports
import {Directive, ElementRef, inject} from '@angular/core';
// #enddocregion imports
// #docregion

// #docregion decorator
@Directive({
  selector: '[appHighlight]',
  host: {
    '(mouseenter)': 'onMouseEnter()',
    '(mouseleave)': 'onMouseLeave()',
  },
})
// #enddocregion decorator
export class HighlightDirective {
  private el = inject(ElementRef);

  // #docregion mouse-methods
  onMouseEnter() {
    this.highlight('yellow');
  }

  onMouseLeave() {
    this.highlight('');
  }

  private highlight(color: string) {
    this.el.nativeElement.style.backgroundColor = color;
  }
  // #enddocregion mouse-methods
}
// #enddocregion
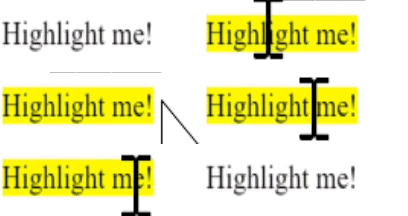
Background color وقتی pointer روی paragraph element hover میکند ظاهر میشود و وقتی pointer خارج میشود ناپدید میشود.
پاس دادن value به یک attribute directive
این بخش شما را در تنظیم highlight color هنگام اعمال HighlightDirective راهنمایی میکند.
- در
highlight.directive.ts،inputرا از@angular/coreimport کنید.
// #docregion, imports
import {Directive, ElementRef, inject, input} from '@angular/core';
// #enddocregion imports

@Directive({
  selector: '[appHighlight]',
  host: {
    '(mouseenter)': 'onMouseEnter()',
    '(mouseleave)': 'onMouseLeave()',
  },
})
export class HighlightDirective {
  private el = inject(ElementRef);

  // #docregion input
  appHighlight = input('');
  // #enddocregion input

  // #docregion mouse-enter
  onMouseEnter() {
    this.highlight(this.appHighlight() || 'red');
  }
  // #enddocregion mouse-enter

  onMouseLeave() {
    this.highlight('');
  }

  private highlight(color: string) {
    this.el.nativeElement.style.backgroundColor = color;
  }
}- یک
inputproperty به نامappHighlightاضافه کنید.
// #docregion, imports
import {Directive, ElementRef, inject, input} from '@angular/core';
// #enddocregion imports

@Directive({
  selector: '[appHighlight]',
  host: {
    '(mouseenter)': 'onMouseEnter()',
    '(mouseleave)': 'onMouseLeave()',
  },
})
export class HighlightDirective {
  private el = inject(ElementRef);

  // #docregion input
  appHighlight = input('');
  // #enddocregion input

  // #docregion mouse-enter
  onMouseEnter() {
    this.highlight(this.appHighlight() || 'red');
  }
  // #enddocregion mouse-enter

  onMouseLeave() {
    this.highlight('');
  }

  private highlight(color: string) {
    this.el.nativeElement.style.backgroundColor = color;
  }
}
تابع input() metadataای به class اضافه میکند که property مربوط به appHighlight در directive را برای binding در دسترس قرار میدهد.
- در
app.component.ts، یک property به نامcolorبهAppComponentاضافه کنید.
import {Component} from '@angular/core';
import {HighlightDirective} from './highlight.directive';

@Component({
  selector: 'app-root',
  templateUrl: './app.component.1.html',
  imports: [HighlightDirective],
})
// #docregion class
export class AppComponent {
  color = 'yellow';
}- برای اینکه directive و color را همزمان اعمال کنید، از property binding با selector مربوط به directive یعنی
appHighlightاستفاده کنید و آن را برابرcolorقرار دهید.
<!-- #docregion v2, -->
<h1>My First Attribute Directive</h1>

<h2>Pick a highlight color</h2>
<div>
  <input type="radio" name="colors" (click)="color = 'lightgreen'" />Green
  <input type="radio" name="colors" (click)="color = 'yellow'" />Yellow
  <input type="radio" name="colors" (click)="color = 'cyan'" />Cyan
</div>
<!-- #docregion color -->
<p [appHighlight]="color">Highlight me!</p>
<!-- #enddocregion color, v2 -->

<!-- #docregion defaultColor -->
<p [appHighlight]="color" defaultColor="violet">Highlight me too!</p>
<!-- #enddocregion defaultColor, -->

<hr />
<h2>Mouse over the following lines to see fixed highlights</h2>

<p [appHighlight]="'yellow'">Highlighted in yellow</p>
<p appHighlight="orange">Highlighted in orange</p>

<hr />

<h2>ngNonBindable</h2>
<!-- #docregion ngNonBindable -->
<p>Use ngNonBindable to stop evaluation.</p>
<p ngNonBindable>This should not evaluate: {{ 1 + 1 }}</p>
<!-- #enddocregion ngNonBindable -->

<!-- #docregion ngNonBindable-with-directive -->
<h3>ngNonBindable with a directive</h3>
<div ngNonBindable [appHighlight]="'yellow'">
  This should not evaluate: {{ 1 + 1 }}, but will highlight yellow.
</div>
<!-- #enddocregion ngNonBindable-with-directive -->
Attribute binding مربوط به [appHighlight] دو کار انجام میدهد:
- highlighting directive را روی element مربوط به
<p>اعمال میکند - highlight color مربوط به directive را با property binding تنظیم میکند
تنظیم value با input کاربر
این بخش شما را در اضافه کردن radio buttonها راهنمایی میکند تا انتخاب color خود را به directive مربوط به appHighlight bind کنید.
- Markup زیر را برای انتخاب color به
app.component.htmlاضافه کنید:
<!-- #docregion v2, -->
<h1>My First Attribute Directive</h1>

<h2>Pick a highlight color</h2>
<div>
  <input type="radio" name="colors" (click)="color = 'lightgreen'" />Green
  <input type="radio" name="colors" (click)="color = 'yellow'" />Yellow
  <input type="radio" name="colors" (click)="color = 'cyan'" />Cyan
</div>
<!-- #docregion color -->
<p [appHighlight]="color">Highlight me!</p>
<!-- #enddocregion color, v2 -->

<!-- #docregion defaultColor -->
<p [appHighlight]="color" defaultColor="violet">Highlight me too!</p>
<!-- #enddocregion defaultColor, -->

<hr />
<h2>Mouse over the following lines to see fixed highlights</h2>

<p [appHighlight]="'yellow'">Highlighted in yellow</p>
<p appHighlight="orange">Highlighted in orange</p>

<hr />

<h2>ngNonBindable</h2>
<!-- #docregion ngNonBindable -->
<p>Use ngNonBindable to stop evaluation.</p>
<p ngNonBindable>This should not evaluate: {{ 1 + 1 }}</p>
<!-- #enddocregion ngNonBindable -->

<!-- #docregion ngNonBindable-with-directive -->
<h3>ngNonBindable with a directive</h3>
<div ngNonBindable [appHighlight]="'yellow'">
  This should not evaluate: {{ 1 + 1 }}, but will highlight yellow.
</div>
<!-- #enddocregion ngNonBindable-with-directive -->AppComponent.colorرا طوری revise کنید که مقدار اولیه نداشته باشد.
// #docregion
import {Component} from '@angular/core';
import {HighlightDirective} from './highlight.directive';

@Component({
  selector: 'app-root',
  templateUrl: './app.component.html',
  imports: [HighlightDirective],
})
// #docregion class
export class AppComponent {
  color = '';
}- در
highlight.directive.ts، method مربوط بهonMouseEnterرا revise کنید تا ابتدا باappHighlighthighlight کند و اگرappHighlightبرابرundefinedبود، بهredfallback کند.
// #docregion, imports
import {Directive, ElementRef, inject, input} from '@angular/core';
// #enddocregion imports

@Directive({
  selector: '[appHighlight]',
  host: {
    '(mouseenter)': 'onMouseEnter()',
    '(mouseleave)': 'onMouseLeave()',
  },
})
export class HighlightDirective {
  private el = inject(ElementRef);

  // #docregion input
  appHighlight = input('');
  // #enddocregion input

  // #docregion mouse-enter
  onMouseEnter() {
    this.highlight(this.appHighlight() || 'red');
  }
  // #enddocregion mouse-enter

  onMouseLeave() {
    this.highlight('');
  }

  private highlight(color: string) {
    this.el.nativeElement.style.backgroundColor = color;
  }
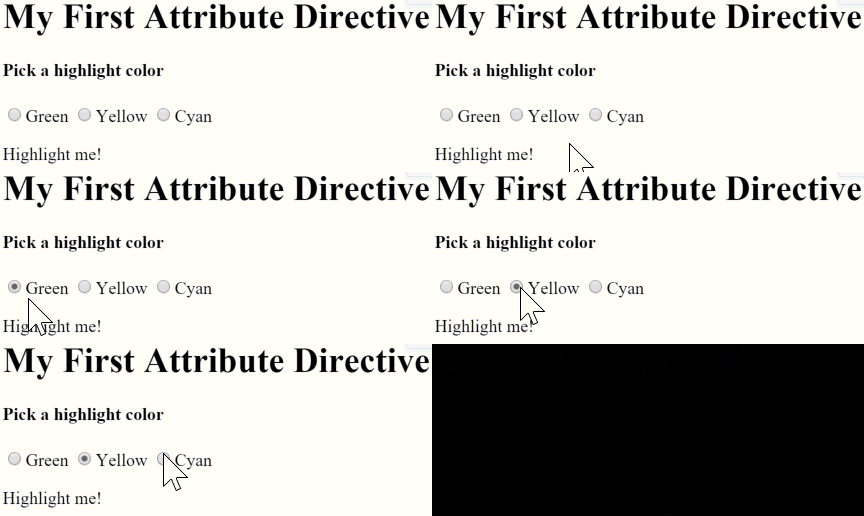
}- Application خود را serve کنید تا verify کنید کاربر میتواند با radio buttonها color را انتخاب کند.
Binding به یک property دوم
این بخش شما را در configure کردن application راهنمایی میکند تا developer بتواند default color را set کند.
- یک
input()property دوم به نامdefaultColorبهHighlightDirectiveاضافه کنید.
import {Directive, ElementRef, inject, input} from '@angular/core';

@Directive({
  selector: '[appHighlight]',
  host: {
    '(mouseenter)': 'onMouseEnter()',
    '(mouseleave)': 'onMouseLeave()',
  },
})
export class HighlightDirective {
  private el = inject(ElementRef);

  // #docregion defaultColor
  defaultColor = input('');
  // #enddocregion defaultColor

  appHighlight = input('');

  // #docregion mouse-enter
  onMouseEnter() {
    this.highlight(this.appHighlight() || this.defaultColor() || 'red');
  }
  // #enddocregion mouse-enter

  onMouseLeave() {
    this.highlight('');
  }

  private highlight(color: string) {
    this.el.nativeElement.style.backgroundColor = color;
  }
}onMouseEnterمربوط به directive را revise کنید تا ابتدا باappHighlighthighlight کند، سپس باdefaultColor، و اگر هر دو property برابرundefinedبودند، بهredfallback کند.
import {Directive, ElementRef, inject, input} from '@angular/core';

@Directive({
  selector: '[appHighlight]',
  host: {
    '(mouseenter)': 'onMouseEnter()',
    '(mouseleave)': 'onMouseLeave()',
  },
})
export class HighlightDirective {
  private el = inject(ElementRef);

  // #docregion defaultColor
  defaultColor = input('');
  // #enddocregion defaultColor

  appHighlight = input('');

  // #docregion mouse-enter
  onMouseEnter() {
    this.highlight(this.appHighlight() || this.defaultColor() || 'red');
  }
  // #enddocregion mouse-enter

  onMouseLeave() {
    this.highlight('');
  }

  private highlight(color: string) {
    this.el.nativeElement.style.backgroundColor = color;
  }
}
در این حالت، binding مربوط به defaultColor از square bracket یعنی [] استفاده نمیکند، چون مقدار یک static string است، نه dynamic expression.
- برای bind کردن به
AppComponent.colorو fallback به "violet" بهعنوان default color، HTML زیر را اضافه کنید.
<!-- #docregion v2, -->
<h1>My First Attribute Directive</h1>

<h2>Pick a highlight color</h2>
<div>
  <input type="radio" name="colors" (click)="color = 'lightgreen'" />Green
  <input type="radio" name="colors" (click)="color = 'yellow'" />Yellow
  <input type="radio" name="colors" (click)="color = 'cyan'" />Cyan
</div>
<!-- #docregion color -->
<p [appHighlight]="color">Highlight me!</p>
<!-- #enddocregion color, v2 -->

<!-- #docregion defaultColor -->
<p [appHighlight]="color" defaultColor="violet">Highlight me too!</p>
<!-- #enddocregion defaultColor, -->

<hr />
<h2>Mouse over the following lines to see fixed highlights</h2>

<p [appHighlight]="'yellow'">Highlighted in yellow</p>
<p appHighlight="orange">Highlighted in orange</p>

<hr />

<h2>ngNonBindable</h2>
<!-- #docregion ngNonBindable -->
<p>Use ngNonBindable to stop evaluation.</p>
<p ngNonBindable>This should not evaluate: {{ 1 + 1 }}</p>
<!-- #enddocregion ngNonBindable -->

<!-- #docregion ngNonBindable-with-directive -->
<h3>ngNonBindable with a directive</h3>
<div ngNonBindable [appHighlight]="'yellow'">
  This should not evaluate: {{ 1 + 1 }}, but will highlight yellow.
</div>
<!-- #enddocregion ngNonBindable-with-directive -->
مثل componentها، میتوانید چند directive property binding به یک host element اضافه کنید.
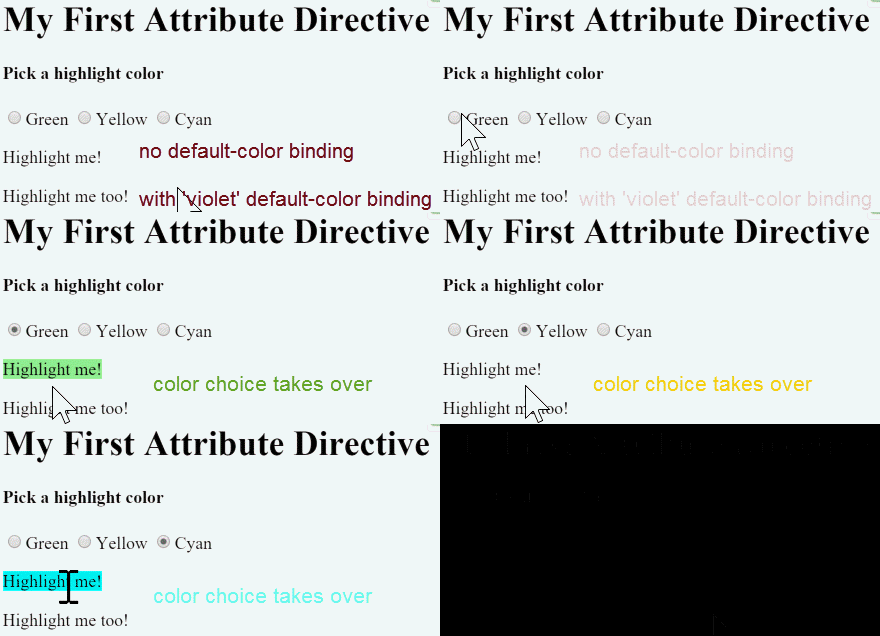
اگر default color binding وجود نداشته باشد، default color برابر red است. وقتی کاربر یک color انتخاب میکند، color انتخابشده به active highlight color تبدیل میشود.
غیرفعال کردن پردازش Angular با NgNonBindable
برای جلوگیری از evaluate شدن expression در مرورگر، ngNonBindable را به host element اضافه کنید. ngNonBindable interpolation، directiveها و binding را در templateها غیرفعال میکند.
در مثال زیر، expression مربوط به {{ 1 + 1 }} دقیقا همانطور render میشود که در code editor شما دیده میشود و 2 نمایش داده نمیشود.
<!-- #docregion v2, -->
<h1>My First Attribute Directive</h1>

<h2>Pick a highlight color</h2>
<div>
  <input type="radio" name="colors" (click)="color = 'lightgreen'" />Green
  <input type="radio" name="colors" (click)="color = 'yellow'" />Yellow
  <input type="radio" name="colors" (click)="color = 'cyan'" />Cyan
</div>
<!-- #docregion color -->
<p [appHighlight]="color">Highlight me!</p>
<!-- #enddocregion color, v2 -->

<!-- #docregion defaultColor -->
<p [appHighlight]="color" defaultColor="violet">Highlight me too!</p>
<!-- #enddocregion defaultColor, -->

<hr />
<h2>Mouse over the following lines to see fixed highlights</h2>

<p [appHighlight]="'yellow'">Highlighted in yellow</p>
<p appHighlight="orange">Highlighted in orange</p>

<hr />

<h2>ngNonBindable</h2>
<!-- #docregion ngNonBindable -->
<p>Use ngNonBindable to stop evaluation.</p>
<p ngNonBindable>This should not evaluate: {{ 1 + 1 }}</p>
<!-- #enddocregion ngNonBindable -->

<!-- #docregion ngNonBindable-with-directive -->
<h3>ngNonBindable with a directive</h3>
<div ngNonBindable [appHighlight]="'yellow'">
  This should not evaluate: {{ 1 + 1 }}, but will highlight yellow.
</div>
<!-- #enddocregion ngNonBindable-with-directive -->
اعمال ngNonBindable روی یک element، binding را برای child elementهای آن element متوقف میکند. با این حال، ngNonBindable همچنان اجازه میدهد directiveها روی همان elementی که ngNonBindable را اعمال کردهاید کار کنند. در مثال زیر، directive مربوط به appHighlight همچنان active است، اما Angular expression مربوط به {{ 1 + 1 }} را evaluate نمیکند.
<!-- #docregion v2, -->
<h1>My First Attribute Directive</h1>

<h2>Pick a highlight color</h2>
<div>
  <input type="radio" name="colors" (click)="color = 'lightgreen'" />Green
  <input type="radio" name="colors" (click)="color = 'yellow'" />Yellow
  <input type="radio" name="colors" (click)="color = 'cyan'" />Cyan
</div>
<!-- #docregion color -->
<p [appHighlight]="color">Highlight me!</p>
<!-- #enddocregion color, v2 -->

<!-- #docregion defaultColor -->
<p [appHighlight]="color" defaultColor="violet">Highlight me too!</p>
<!-- #enddocregion defaultColor, -->

<hr />
<h2>Mouse over the following lines to see fixed highlights</h2>

<p [appHighlight]="'yellow'">Highlighted in yellow</p>
<p appHighlight="orange">Highlighted in orange</p>

<hr />

<h2>ngNonBindable</h2>
<!-- #docregion ngNonBindable -->
<p>Use ngNonBindable to stop evaluation.</p>
<p ngNonBindable>This should not evaluate: {{ 1 + 1 }}</p>
<!-- #enddocregion ngNonBindable -->

<!-- #docregion ngNonBindable-with-directive -->
<h3>ngNonBindable with a directive</h3>
<div ngNonBindable [appHighlight]="'yellow'">
  This should not evaluate: {{ 1 + 1 }}, but will highlight yellow.
</div>
<!-- #enddocregion ngNonBindable-with-directive -->
اگر ngNonBindable را روی یک parent element اعمال کنید، Angular interpolation و هر نوع binding مثل property binding یا event binding را برای childهای آن element غیرفعال میکند.